Dusk Tactics Tileset Specs
Dusk Tactics Tileset Specs
Dusk Tactics Map
This section is mainly info about how the actual maps are setup. When you’re previewing new tiles in the map editor, you can see, or imagine, how they would look in-game.
Dusk Tactics uses the Tiled Map Editor to create maps. To achieve the isometric perspective we use map layers to lay down tiles, similar to building Legos. Each tile is 64 x 32 x 16 which is represented by 64 x 48 in the map editor (the height and depth are added together since we’re working in 2.5D). The difficult part when working with tiled maps in an isometric perspective is depth sorting. Everything needs to render in a specific way so we get that pseudo-3D look we’re going for.
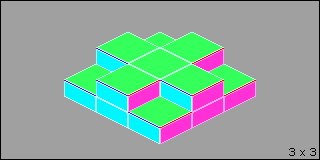
There’s a bunch of different ways to handle this, but I decided to use columns. So the map is essentially made up of stacks of tiles on each coordinate. The higher the stack, the higher the tile’s height.
This works fine for tile-shaped objects, but when we start adding anything else, it has some problems, so we set up some rules. Each stack can only have a single ‘object’. This is either a Unit or a Prop. Units are the little guys that run around the map, while Props make up anything that’s part of the map but not in the shape of a tile, such as crates, barrels, signposts, etc.
Props do not allow Units to walk on them, unlike tiles, however some Props can be destroyed at which point they’d be removed from the map and Units would potentially be allowed to walk where the Prop was situated.
The engine handles rendering units and props correctly, but unfortunately Tiled is unable to do that. Well it can do it, but it would require each layer have it’s own dedicated layer just for Props which makes the map editor very messy and hard to use. Keeping the map editor simple to use, and keeping map creation time low are problems I am hoping to fix with the new tileset layout. I go into more detail about these in the Tiled Map Editor Limitations section below.
Tiled Map Editor & Tileset Format
If you’re familiar with Tiled Map Editor, that helps, but it’s a pretty simple program and I’ll also be providing a default map file that you can open right up and play around with. Most general map tilesets are based on 1024×1024 images which contain up to ~336 tiles. They are generally separated by biome, i.e. grass, dirt, etc. There are two exceptions to this, the ‘props’ tileset and the ‘water’ tileset. Both of these are different sizes with the prop tileset having an entirely different grid size (64 x 160).
The tilesets included with the map are what I am currently working with; a new format I recently implemented (the previous version was just a humongous, messy, tileset image that was over 10k pixels in height…).
The tilesets are TMX files, which is just XML. Both the image and the tileset files are named the same, so it’ll be ’tileset.tmx’ & tileset.png’. If you edit the image file, upon saving, the updates should be reflected immediately in Tiled. There’s no resizing or anything so this should be a simply process.
If you’re not familiar with the editor, you’ll simply be editing the image files and they should be placeable on the tilemap right away for an easy pipeline. You don’t need to open up the tilesets themselves in Tiled, you can simply open the map and it will have all the tilesets loaded.
The prefix system is basically 0 for Props, 1 for water tiles, 2 for basic tiles, 3 for specialty tiles like those for buildings/houses.
- Included Tilesets
- 0_props (0_props.png, 0_props.tmx) [64 x 160 / 20 Columns / 600 Tiles Max]
special tileset that deals with map objects, has animation setup for lighting related objects - 1_water (1_water.png, 1_water.tmx) [64 x 48 / 16 Columns / 800 Tiles Max]
special tileset, entirely animated tiles that make up basic water tiles, only 1st column is used in maps - 2_dirt (2_dirt.png, 2_dirt.tmx) [64 x 48 / 16 Columns / 336 Tiles Max]
- 2_grass (2_grass.png, 2_grass.tmx) [64 x 48 / 16 Columns / 336 Tiles Max]
- 3_bldg (3_bldg.png, 3_bldg.tmx) [64 x 48 / 16 Columns / 336 Tiles Max]
- 0_props (0_props.png, 0_props.tmx) [64 x 160 / 20 Columns / 600 Tiles Max]
The main focus for now will be with the 2_ tiles, specifically grass. What you’ll see in the files is what I am currently using. You’ll notice some tiles sort of breaks the design specified in the tile document.
 For example, the grass tiles are offset vertically so that there is more space on top, this allows the creation of more defined edging as shown below.
On the left we compare a tile with edging on all four sides vs a tile without edging. You’ll see on the bottom row that these grass tiles go beyond the tile template. It’s fine to do this so long as it works.
There are some issues when doing this, however.
 It could cause problems when tiling next to tiles that don’t break the template. It can also create small problems even when not mixing as shown below.
The bottom of the tile doesn’t exactly match and you’re left with a gap where the tiles are meant to line up. Also if that bottom tile is the bottom left corner of the map, it’ll be noticeable.
This is a very minor issue, really.
I apologize if this is really obvious stuff I’m outlining, haha. I haven’t really worked with many artists so I just thought I’d type up anything that came to mind.
The next section gets to the most important part of the tileset and something I’d like you to focus on first and foremost, the ‘walls’ or ‘sides’ of the tile. What they look like and how they tile vertically.
Overall, I kind of like the grass edging. I have files for it without the middle grass parts, so you can use that (i.e. overlay it and modify) if you want. The edging for the dirt tiles are a bit more reigned in and not as offset, but it still features similar issues.
Vertical Tiling
This is the part I honestly couldn’t manage. For the side, rocky-wall part of the tile, I used resources from an abandoned tileset that didn’t feature vertical tiling, so I had to sort of make my own.

If you’ve looked at the tilesets, you might have noticed that they all have what looks to be the same tiles repeating in the first 3 or 4 rows. This winds up taking up a lot of space on the tileset as a whole, not a huge deal, but it makes creating maps a bit more difficult.
I couldn’t make the vertical tiling work with less than 3 tiles otherwise it was a very obvious repeating pattern. I’ve looked into different games in the genre to see what they do, my biggest inspiration being Tactics Ogre for the SNES/PSX. Many of the older games don’t actually make their maps like this. They just create an image and then overlay coordinates. One of the things I wanted for Dusk Tactics was for the world to sort of feel like it was made of tiles. I have some features and things that require there to be actual tiles, so that design choice sort of left me looking elsewhere. A more recent release, Arcadian Atlas, created 64 x 64 tiles and managed some very interesting vertical tiling, which includes varying textures and transitions, i.e. from dirt to rock, or rock to a different kind of rock.
Below are some examples of maps from Arcadian Atlas, a game that has really great pixel art overall.


Style & References
I almost forgot what is probably the most important part: the style. The current tileset is pretty close to where I envision the overall style going. It may need to be a bit less complex for it to get done within the budget, but it’s close.
The game itself is mid-fantasy, medieval equivalent setting maybe even steampunk, but with less steam? The time period would be equivalent to a pre-industrial world, maybe some features from 1800s european style. I’ll post some references and games that I’d like to take some inspiration from. Arcadian Atlas is definitely one, as pictured above.
I’ll put some references here.
Tactics Ogre is a major influence behind Dusk Tactics and I’ve always loved their tileset. It’s over 25+ years old at this point, and a much smaller resolution, but it’s been my ideal style. The PSP version showed off a slightly higher quality version.
-Rime-Chapter2-ChaoticBattle&Training(Unmarked).png)
I styled the tiles you’ll find in the 3_bldg tileset after this game. I recently created a new set for buildings, it still needs work, but it’s one of the few parts of the map tileset that I plan to keep going forward.
Luminous Arc 1 & 2 for the Nintendo DS have similar issues where the maps are a smaller resolution, but they can give a good idea of the design intent.
Final Fantasy Tactics Advance is a great series to look at in terms of art design. The original Final Fantasy Tactics for PSX is also good but it uses 3D backgrounds. The colors and designs are all great references.
Tiled Map Editor Limitations
As mentioned above, Tiled allows us to create a map that will look almost identical to the in-game version except for props. Since Props do not stack, there can only ever be 1 in a single column, or coordinate. Props are added to a special, single layer, which is not depth sorted to keep it simple.

To the left is a basic map that’s 5 x 5 (5 tiles in width and length) and contains 3 layers.
 Here is how this would look in the Tiled Map editor, you sort of have to go by the coordinate as it’s not depth sorted.
 This is what it would look like in game. It can also look like this in the map editor if you give every map layer a special ‘prop’ layer. While it helps to have maps look as close to in-game as possible, it’s not always worth the extra work needed to do so.
Terrain Overlays
The way I currently handle terrain is to have a base tile, with possible variants. When the base tile is placed on a map and the map is rendered in the game, the appropriate transition tiles will be used so I don’t have to place everything by hand.
There’s a few different types of overlays. One type is edges, and these are for either the edge of the map, or places where the height changes, so basically a cliff edge. The second is transitions which are partial tiles that are generated to blend two terrains, for example grass and dirt. The final type is outlining, which is essentially drawing a thick, sometimes dark, line over the side of a tile so it is easier read on the map. This last type is mostly used for roof tiles to show where walkable areas begin and end.
Note that the strips of tiles below are in a particular order as the algorithm I am using calculates the # of nearby tiles that are similar and converts that into a number which becomes the index of this 15 tile array (there’s 1 that’s blank and not included, so it’s 16 total).
Terrain Edges
![]()
Here is an example of how the edges are applied in the engine. On the left side of the image, we see what the map looks like in Tiled Map Editor and on the right is how it’s rendered in-engine. 
Terrain Transitions
![]()
Here is an example of how the edges are applied in the engine. On the left side of the image, we see what the map looks like in Tiled Map Editor and on the right is how it’s rendered in-engine. 
Engine Rendering
There are two reasons why we do it this way. The first is memory overhead. For the grass terrain, the final texture that is read by the GPU will contain only the base tile (32×64) and the two strips above which is a very small memory footprint for the variety of tiles we can draw.
The second reason is that in-game, terrain can be modified during battle. Fire can burn away grass, revealing the dirt below. There’s a pre-set hierarchy which can be modified per map that allows us to layer up to 4 terrains with minimal effort. For example, snow -> grass -> dirt -> rock. Using this method, each terrain can properly transition with any of the other terrains using an internal order to identify which terrain should always be drawn above the other. Both edges and transitions are utilized and in the end we have a dynamic map that is very easy to create.
Expansion: Pathways
Paths are always drawn over the highest terrain, but there are times when the path might be more than a single tile in width. For this reason paths require the standard 16 tile terrain transitions (which sort of treats the path as if it were a terrain) and then a series for just single tile width paths. (Note: These are not in the proper order) So something like this: